
Transforming a space into a stylish, functional room can feel overwhelming without a clear plan. Whether it’s a bedroom, living room, or even a compact studio, following systematic room styling steps ensures the result is visually appealing, organized, and reflective of your personality. In this guide, we’ll walk through 10 expert-level steps to take your room from bare walls to a beautifully styled sanctuary, covering everything from layout and lighting to decor and finishing touches.
Step 1: Assess Your Space and Define Its Purpose
Contents
- 1 Step 1: Assess Your Space and Define Its Purpose
- 2 Step 2: Choose a Style and Color Palette
- 3 Step 3: Create a Room Styling Checklist
- 4 Step 4: Plan Furniture Layout
- 5 Step 5: Layer Lighting for Ambience and Function
- 6 Step 6: Add Textures and Soft Furnishings
- 7 Step 7: Decorate Walls and Define Focal Points
- 8 Step 8: Incorporate Decorative Accessories
- 9 Step 9: Review Functionality and Flow
- 10 Step 10: Final Touches and Personalization
- 11 Conclusion:
Every successful room styling workflow begins with a thorough understanding of the space you’re working with. Start by measuring the room’s dimensions, noting ceiling height, window placement, and doorways. Take stock of architectural features such as built-in shelves, fireplaces, or unique wall shapes, as these will guide your furniture arrangement and focal points. Defining the room’s purpose is equally critical: Is it a restful bedroom, a multifunctional home office, or a lively living room? Knowing the function informs every subsequent decision, from color palette selection to furniture style. This initial assessment forms the foundation for a smooth start-to-finish room decorating process.

Step 2: Choose a Style and Color Palette
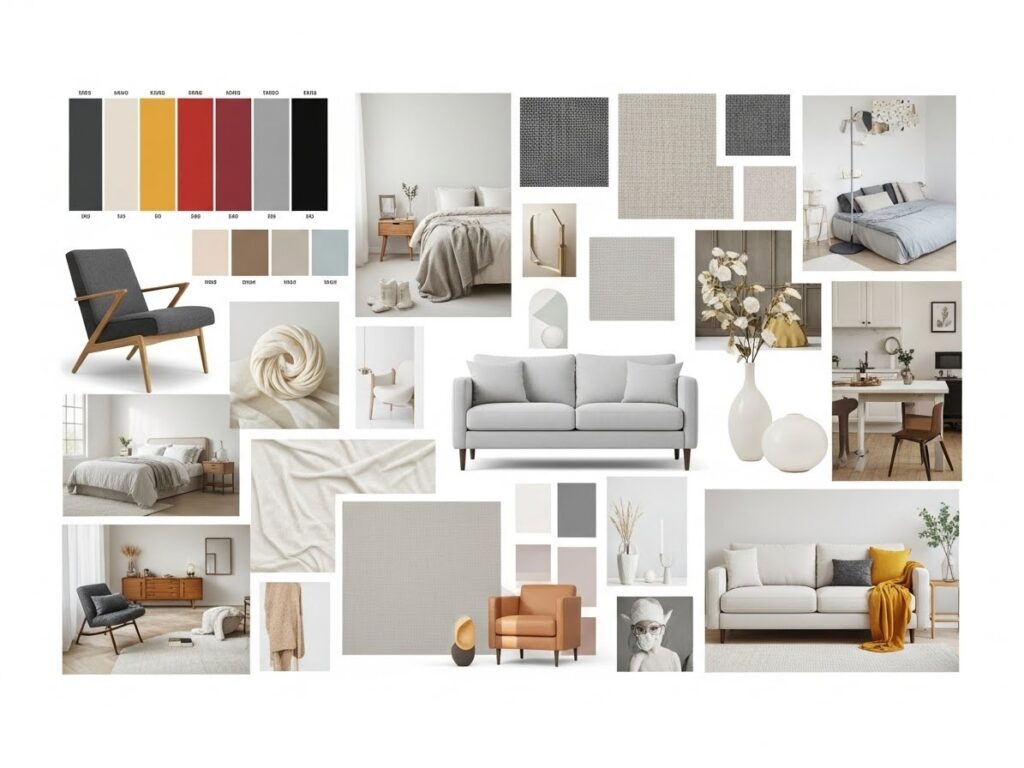
Once you understand your space, selecting a cohesive style and color palette is the next step. For those following modern room styling steps, neutral shades, clean lines, and minimalist furniture are key, while a traditional aesthetic may incorporate rich textures, ornate furnishings, and patterned fabrics. For eclectic or layered looks, blend contemporary pieces with classic accents to create visual interest. Limit your palette to 2–4 main colors to maintain balance—neutrals as a base with accent tones for personality. Using a defined palette early in the process simplifies decisions regarding furniture, textiles, and decor, ensuring all elements align cohesively.

Step 3: Create a Room Styling Checklist
A detailed room styling checklist keeps the project organized and ensures no important element is overlooked. Begin with essential furniture pieces, like a bed, sofa, or dining table, and consider storage units that are both functional and decorative. Include lighting options—ambient, task, and accent—to layer illumination effectively. Soft furnishings, such as rugs, curtains, and cushions, should be noted for color, texture, and proportion. Don’t forget accessories like artwork, mirrors, plants, and personal items that infuse personality into the space. A checklist also helps when shopping or sourcing items, ensuring the complete room styling process runs efficiently and prevents impulse buys that may clash with the intended design.

Step 4: Plan Furniture Layout
Arranging furniture strategically is one of the most important room setup ideas step by step. Start with key pieces first—the bed in a bedroom, the sofa in a living area, or the dining table in a multipurpose room. Ensure that the layout promotes natural movement and doesn’t obstruct pathways. Use rugs to define zones, especially in open-concept spaces, and maintain balance by distributing visual weight evenly across the room. For small rooms, consider multifunctional or space-saving furniture to maximize usability without overcrowding. Effective furniture placement lays the groundwork for all subsequent styling elements, from lighting to decor, and is crucial for a professional-looking finish.

Step 5: Layer Lighting for Ambience and Function
Lighting dramatically influences a room’s mood and functionality. Follow interior styling steps by incorporating multiple layers of lighting. Ambient lighting, typically overhead fixtures or recessed lights, provides general illumination. Task lighting, such as bedside lamps, desk lights, or kitchen under-cabinet fixtures, ensures specific areas are well-lit for functional purposes. Accent lighting highlights artwork, architectural features, or textured walls, adding depth and drama. Consider dimmers to adjust intensity for different times of day, enhancing flexibility and comfort. Proper lighting not only beautifies the room but also supports practical daily use, aligning perfectly with modern room styling steps.

Step 6: Add Textures and Soft Furnishings
Introducing varied textures transforms a flat, impersonal room into a layered and inviting space. Rugs, throws, cushions, and curtains contribute tactile interest while also enhancing visual warmth. Incorporate materials like velvet, cotton, linen, leather, and natural fibers to create contrast and richness. Furniture upholstery is another opportunity to introduce texture—mix smooth wooden finishes with plush seating for balance. Step-by-step bedroom styling or living room setups benefit greatly from texture layering, as it softens the overall aesthetic and makes the space feel lived-in. This step is particularly crucial for room styling for small spaces, where texture adds depth without crowding the room.

Step 7: Decorate Walls and Define Focal Points
Walls are not just background—they are key elements in your room styling sequence. Start by establishing focal points such as a statement art piece, a gallery wall, or a decorative mirror. Mirrors not only enhance visual interest but also create an illusion of more space, particularly in small rooms. Shelving units combine storage and display functions, allowing books, plants, or collectibles to become part of the decor. Consider wall treatments like wallpaper, paint, or textured finishes that complement your palette and style. Thoughtful wall styling ensures the room feels intentional, cohesive, and visually balanced.

Step 8: Incorporate Decorative Accessories
Once the major elements are in place, turn attention to stepwise room decorating ideas that bring personality and charm. Accessories like vases, sculptures, framed photos, and decorative trays complete the space. Plants and greenery introduce life and color, while lighting accents, like table lamps or candles, add warmth. Accessories should enhance rather than clutter the room, acting as finishing touches that reflect your lifestyle. These final decorative elements are what differentiate a professionally styled room from a basic setup.

Step 9: Review Functionality and Flow
Even after achieving a visually appealing layout, evaluating functionality is vital. Walk through the room to check for ease of movement, accessibility of furniture, and practicality of storage. Consider how the space feels at different times of day—natural and artificial lighting can change the perception of color and ambiance. Adjust rugs, furniture, or decor to improve flow and usability. This review aligns with practical room styling tips that professionals use to ensure both beauty and livability. A thoughtful, functional space is as important as aesthetic appeal in the overall room styling process diagram.

Step 10: Final Touches and Personalization
The final step in your full room design guide is personalization. Introduce elements that reflect your identity, hobbies, or experiences. A cozy reading nook, curated coffee table, or framed travel photos add individuality to the room. Reevaluate accessories, lighting, and furniture placement to ensure everything feels harmonious. Even small details, like matching hardware or strategically placed throw blankets, enhance the sense of cohesion. By completing this step, your room transitions from a well-planned arrangement to a space that is truly yours—comfortable, functional, and stylish.

Conclusion:
Mastering room styling steps is about following a logical, thoughtful workflow from assessment and planning to final decorative touches. By addressing layout, lighting, textures, walls, and accessories in a systematic way, you can transform any empty room into a welcoming, functional, and visually pleasing space. These ten steps from defining the purpose to personalizing the final touches—cover the essentials for beginners and provide professional insights for seasoned decorators. Following this guide ensures a successful complete room styling process, giving your space personality, balance, and a polished finish.
With a clear process, practical tips, and attention to detail, anyone can master room styling steps, creating spaces that are not only beautiful but also livable and reflective of their unique style.