
Introduction:
Contents
- 1 Introduction:
- 1.1 1. Classic White Beadboard Ceiling
- 1.2 2. Beadboard Ceiling with Exposed Joists
- 1.3 3. Drop Ceiling Replacement with Beadboard Panels
- 1.4 4. Tongue-and-Groove Beadboard Look
- 1.5 5. Painted Beadboard Ceiling in Soft Blue
- 1.6 6. Beadboard Ceiling Between Beams
- 1.7 7. Beadboard Ceiling with Recessed Lighting
- 1.8 8. Faux Coffered Beadboard Ceiling
- 1.9 9. Utility Room Beadboard Ceiling
- 1.10 10. Beadboard and Drywall Combo
- 1.11 11. Stained Wood Beadboard Panels
- 1.12 12. Budget-Friendly MDF Beadboard
- 1.13 13. Vertical Beadboard Orientation
- 1.14 14. Whitewash Wood Beadboard
- 1.15 15. Coffered Ceiling with Beadboard Inset
- 1.16 16. Painted Grid with Beadboard Inserts
- 1.17 17. Small Space Ceiling Design
- 1.18 18. Gloss Finish Beadboard Ceiling
- 1.19 19. Accent Ceiling with Colored Beadboard
- 1.20 20. Beadboard Ceiling with Ceiling Fan
- 1.21 21. Hidden Wiring Behind Beadboard
- 1.22 22. DIY Ceiling with Pre-Primed Panels
- 1.23 23. Rustic Look with Reclaimed Beadboard
- 1.24 24. Ceiling Paint Contrast with Beadboard
- 1.25 25. Shiplap-Look Beadboard
- 1.26 26. Suspended Beadboard Ceiling System
- 1.27 27. Crown Molding Accents
- 1.28 28. Beadboard Ceiling in Basement Bathroom
- 1.29 29. Beadboard on a Sloped Basement Ceiling
- 1.30 30. Hidden Access Panels in Beadboard Ceiling
- 2 Final Thoughts:
A basement ceiling makeover can be one of the simplest ways to transform an unfinished or outdated space. Using beadboard as a ceiling treatment brings charm, character, and brightness to basements, especially when you’re replacing a drop ceiling. This list offers 30 easy, DIY-friendly, and affordable ceiling upgrade ideas using beadboard panels and other common materials. Whether you’re refreshing a utility room, adding wainscoting on stairs for extra style, or finishing a basement living space, these ideas make home improvement feel more approachable.
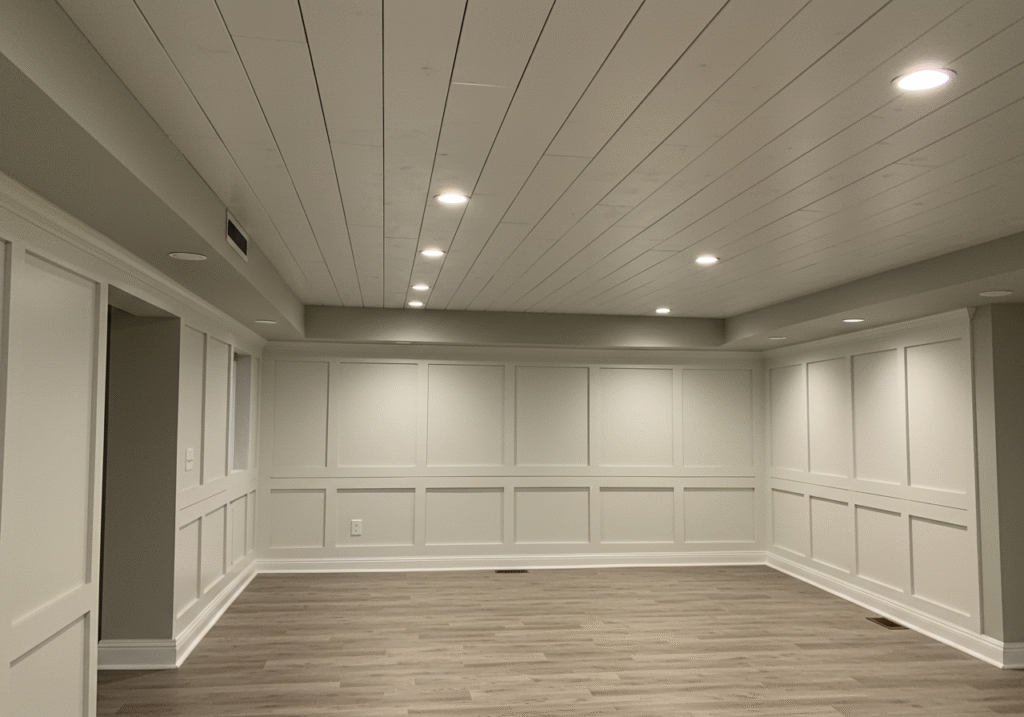
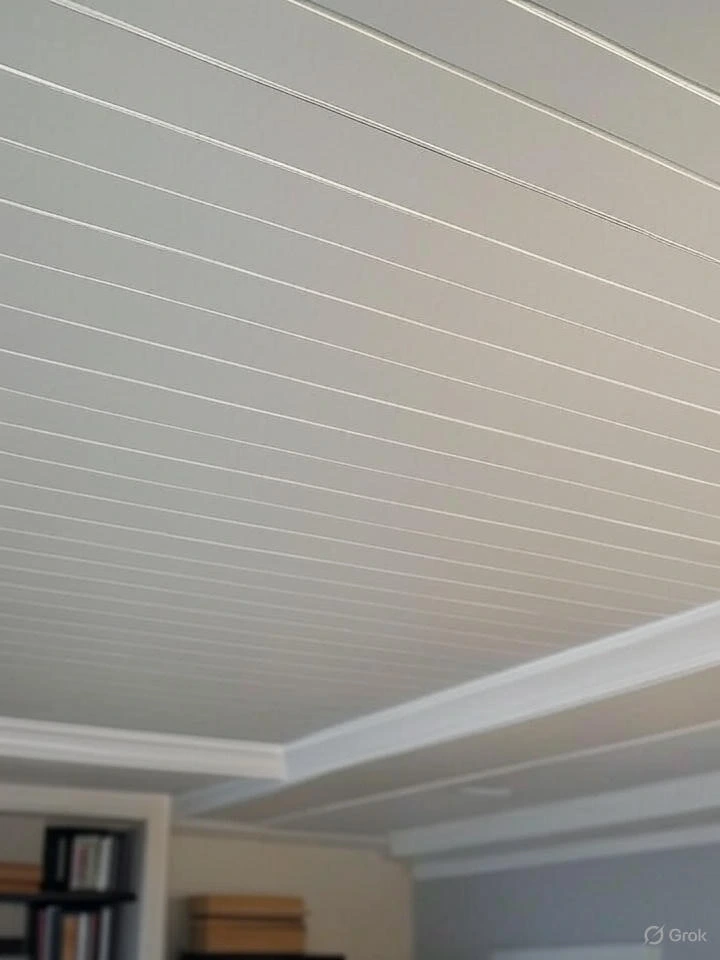
1. Classic White Beadboard Ceiling
Install white beadboard panels directly onto furring strips attached to your basement joists. This design offers a timeless, clean look and helps reflect light in a darker room. Finish it off with crown molding for a polished appearance.
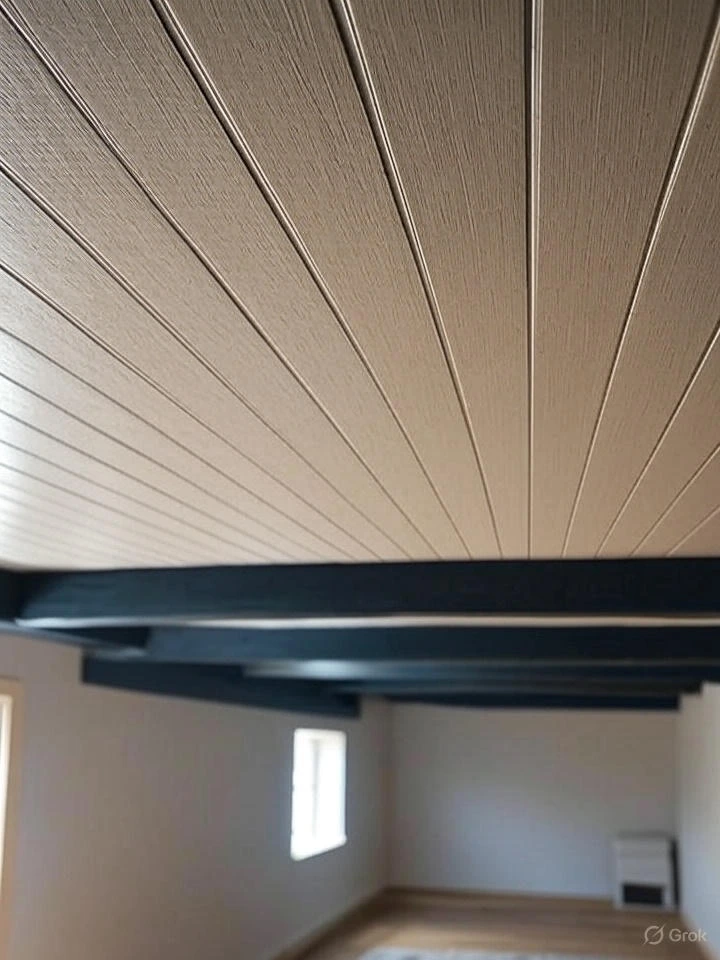
2. Beadboard Ceiling with Exposed Joists
Keep your joists exposed and paint them to match or contrast your beadboard ceiling boards. This ceiling idea adds visual interest while maintaining the rustic charm of a wood ceiling. It also allows easy access to basement utilities.
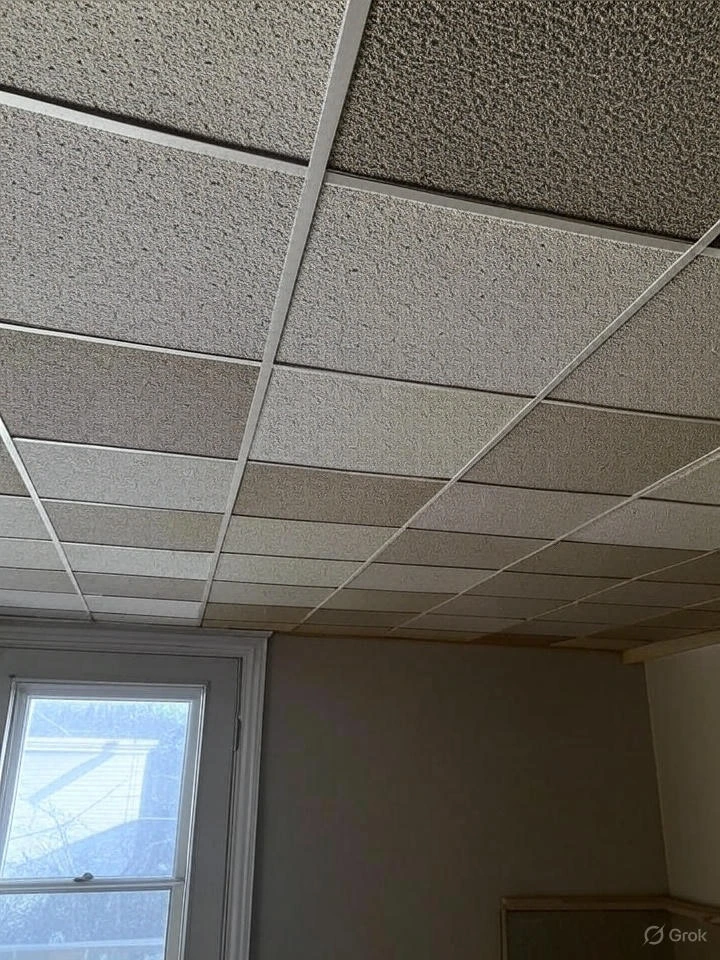
3. Drop Ceiling Replacement with Beadboard Panels
Replace outdated acoustic tiles in a ceiling grid with lightweight MDF beadboard inserts. This DIY ceiling solution upgrades your basement ceiling while keeping the existing frame intact. It’s perfect for a quick ceiling renovation.
4. Tongue-and-Groove Beadboard Look
Use tongue-and-groove MDF panels for a seamless, uniform appearance. This beadboard ceiling idea works especially well in finished basements used as playrooms or home offices. Seal and paint the panels with ceiling paint to brighten the space.
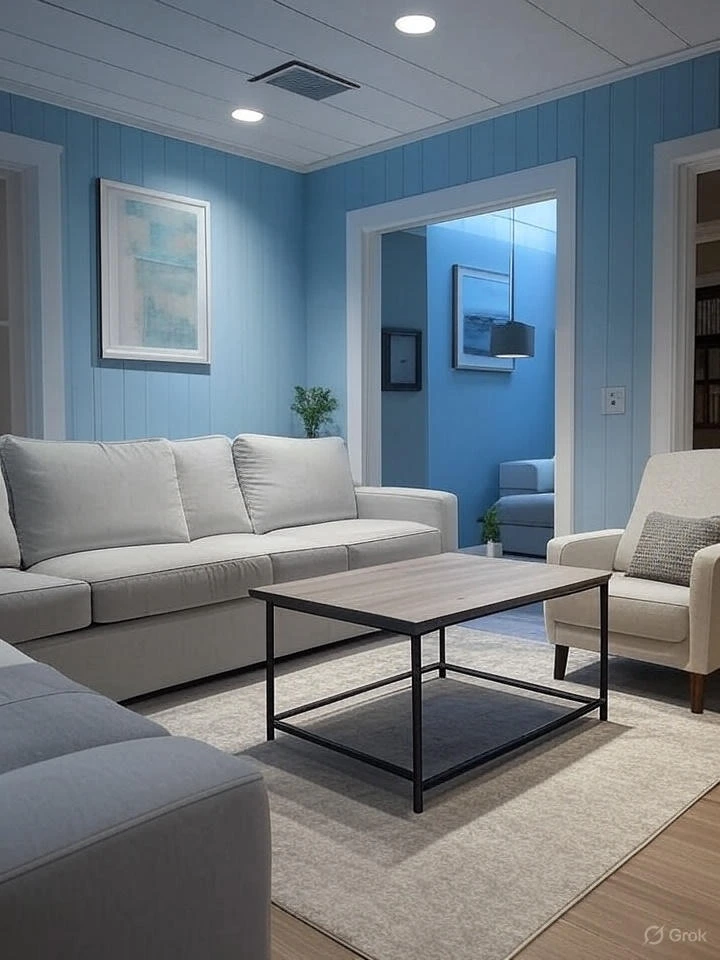
5. Painted Beadboard Ceiling in Soft Blue
Add a touch of color to your basement with soft blue beadboard panels. The gentle hue gives the illusion of height and airiness, enhancing interior design appeal. Pair it with white trim for contrast.
6. Beadboard Ceiling Between Beams
Highlight existing wood beams by installing beadboard panels between them. This ceiling treatment preserves architectural interest while upgrading the look. Use caulk and primer before painting for a professional finish.

7. Beadboard Ceiling with Recessed Lighting
Incorporate recessed lighting into beadboard ceiling boards for a clean, modern upgrade. Carefully cut holes for fixtures, making sure to plan your layout before installing. It’s an affordable ceiling idea that improves functionality.

8. Faux Coffered Beadboard Ceiling
Create a coffered effect by framing sections of beadboard with narrow trim or furring strips. This ceiling makeover offers the elegance of detailed interior design without the heavy construction. Paint all elements one cohesive color.

9. Utility Room Beadboard Ceiling
Use PVC panels in utility spaces for moisture resistance and easy cleaning. These beadboard panels snap into place and don’t require painting. Ideal for laundry rooms or storage areas in the basement.

10. Beadboard and Drywall Combo
Pair drywall around the room’s perimeter with beadboard ceiling panels in the center. This layout gives a stylish border effect and uses ceiling paint to tie the two materials together. It’s a smart ceiling renovation choice.

11. Stained Wood Beadboard Panels
Instead of painting, stain wood beadboard to showcase its natural grain. This ceiling idea suits rustic or cabin-style basements. Use clear sealant to protect the wood from moisture.

12. Budget-Friendly MDF Beadboard
MDF panels offer an affordable ceiling option while still delivering a classy look. They’re easy to cut and install with adhesive and nails. Finish with caulk at seams for a seamless result.

13. Vertical Beadboard Orientation
Try installing beadboard boards vertically rather than horizontally. This unusual layout adds dimension and interest to small basement areas. Combine with minimal decor for a modern feel.

14. Whitewash Wood Beadboard
Whitewashing wooden beadboard panels gives a coastal, airy vibe. This ceiling treatment is great for basement guest rooms or lounges. Use a light whitewash stain and soft cloth for application.

15. Coffered Ceiling with Beadboard Inset
Combine MDF grid molding with beadboard panels for a formal coffered effect. This ceiling upgrade creates high-end appeal on a budget. Paint everything with ceiling paint for a unified finish.

16. Painted Grid with Beadboard Inserts
Paint your ceiling grid in a contrasting shade to make beadboard panels pop. This method gives new life to old ceiling tiles in drop ceiling setups. Choose colors that enhance your basement’s interior design.

17. Small Space Ceiling Design
In smaller basement rooms, use narrow beadboard strips to avoid overwhelming the space. These ceiling boards make the ceiling feel higher and roomier. Stick to light paint tones.

18. Gloss Finish Beadboard Ceiling
Add ceiling paint in a semi-gloss or gloss finish for extra reflectivity. This makes the space feel larger and adds a touch of shine. Perfect for basements with limited natural light.

19. Accent Ceiling with Colored Beadboard
Make your ceiling the focal point by painting beadboard in a bold shade. This interior design idea works well for game rooms or play areas. Keep the walls neutral to balance the effect.

20. Beadboard Ceiling with Ceiling Fan
Install a ceiling fan into a beadboard ceiling for comfort and air circulation. Use a sturdy mounting kit and cut the opening carefully. This combination is ideal for multi-use basement spaces.

21. Hidden Wiring Behind Beadboard
Run wiring for lights and speakers above your beadboard ceiling boards. This ceiling renovation keeps your space tidy and modern. Ensure proper ventilation and code compliance.

22. DIY Ceiling with Pre-Primed Panels
Choose pre-primed MDF beadboard panels to save time on your DIY ceiling project. These panels require fewer coats of paint and reduce mess. Great for first-time home improvement.

23. Rustic Look with Reclaimed Beadboard
Use reclaimed or salvaged beadboard ceiling boards for a distressed, farmhouse vibe. Each piece adds character and history to your basement. Be sure to clean and seal before installing.

24. Ceiling Paint Contrast with Beadboard
Paint beadboard panels and ceiling trim in different but complementary tones. This ceiling treatment enhances visual depth and design interest. Choose colors that align with your basement’s style.

25. Shiplap-Look Beadboard
Use wide beadboard panels to mimic the look of shiplap. This simple twist on a traditional beadboard ceiling adds a trendy touch. It’s great for blending modern and rustic aesthetics.

26. Suspended Beadboard Ceiling System
Create a DIY suspended ceiling using beadboard panels in a lightweight frame. Ideal for basements where access to pipes or wiring is needed. Finish with molding for a seamless look.

27. Crown Molding Accents
Add crown molding where the beadboard ceiling meets the walls. This final touch elevates even a simple ceiling makeover. Use caulk to fill any gaps for a smooth result.

28. Beadboard Ceiling in Basement Bathroom
Use PVC beadboard panels for moisture-prone basement bathrooms. They resist mold and warping, making them a durable option. Finish with waterproof ceiling paint for longevity.

29. Beadboard on a Sloped Basement Ceiling
Install beadboard along the angle of a sloped ceiling to follow the roofline. This design choice emphasizes the architecture of your basement space. Use trim to cleanly finish the edges.

30. Hidden Access Panels in Beadboard Ceiling
Install discreet access panels within your beadboard ceiling for maintenance purposes. Use matching materials to keep them inconspicuous. It’s a smart ceiling idea for utility rooms or finished spaces with plumbing.

Final Thoughts:
A beadboard ceiling is a versatile, budget-friendly solution for updating any basement ceiling. With so many simple DIY ceiling ideas available, it’s easy to find a style that fits your home improvement goals. Whether you’re replacing a drop ceiling, hiding utilities, or just adding charm, beadboard offers a clean, polished result. Explore these options to create a space that feels finished, functional, and stylish.